2 Rguroo Dataset Editor
Create new datasets and edit existing datasets
Copy-paste data within the editor
Copy-paste data to and from an external source
Search and replace text
Add, remove, and rename variables
Add and remove rows
Reorder variables
Filter data
Define variable properties
Define variable types (numerical, nominal, ordinal, label/ID)
Edit levels of categorical variables (reorder, relabel)
Additional utilities
Obtain a quick data summary
Sort data
Pin columns and resize columns
Export data as CSV or Excel
The following are the main components of the dataset editor:
 Search and Replace icon, used for searching and replacing text.
 Variable and Row Management icon, used for performing tasks such as renaming variables, adding variables, managing variable types, relabeling and reordering levels of Factor (categorical) variables, and adding rows and variables.
 Summary Data icon, used for getting a quick data summary for the dataset that is being viewed.
 Transpose Data icon, used for Transposing data (switching rows and columns).
 Deleted Rows icon, used for retaining deleted rows and restoring them.
 Variable Context Menu icon appears when your cursor is placed over a variable name on the header. It provides options for for pinning and auto-sizing columns and renaming the corresponding variable.
Right-click on a cell provides options for copying and cutting selected cells, and pasting then (using Cntrl+V). It moreover, allows for adding and deleting rows, and exporting data to a CSV or Excel file.
 Quick Search textbox, used for forward and backward text search.
 Quick Filter textbox, used for filtering rows that contain a specific text within the entire dataset.
 Save As textbox, used for saving datasets.
 Column Sidebar Menu, located on the right-hand side of the editor window, includes a list of all the variables in the dataset. It is used for reordering, removing, or restoring removed variables (columns).
 Filter Sidebar Menu, located on the right-hand side of the editor window, includes a list of all the variables in the dataset. It is used for filtering specific values within each variable.
2.2 Creating and Editing Datasets
2.2.1 Creating a new dataset
You can create and save a new dataset using the following instructions:
Instructions for Creating a New Dataset
Open the Data toolbox located on the left-hand side of the Rguroo application window.
Click on the Data Import dropdown,
 , and select the Create New Dataset option. The Create New Dataset dialog opens. Specify the number of rows and columns for your new dataset.
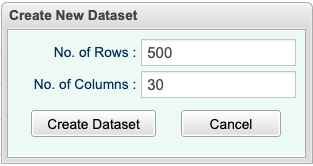
Figure 2.1: Dialog for Selecting Number of Rows and Columns.
The default variable names will be Var1, Var2, etc. Refer to the Section Changing Variable Names to see how to change the variable names.
Enter your data. See the Notes below on how to navigate between cells when entering data.
Enter a name for your dataset in the Save As textbox on the top, and click the
 button to save your dataset.
Notes About Creating New Datasets:
- By default, the number of rows is set to 500 and the number of columns is set to 30. You have the option to modify these values. If you are uncertain about the specific number of rows and columns you will need,select a larger grid by specifying a large number of rows and columns. This ensures that you have enough space to accommodate your data. After saving the dataset, when you reopen it, the grid will automatically adjust to match the actual number of rows and columns used by your data.
- You can add additional rows and columns, if needed (see section 2.3).
- When you login, Rguroo’s dataset editor opens in a tab without any data. You can close the dataset editor tab at anytime.
- To enter values into cells and navigate through them using the keyboard, follow these instructions:
- Click on a cell to select it.
- Type in the desired value.
- To move horizontally between cells:
- Press the Tab key to move forward.
- Press the Shift-Tab keys to move backward.
- To move up and down between cells:
- Type in a value.
- Press the Enter key.
- Use the up, down, right and left arrow key to move to the adjacent cells in the respective direction.
To edit an existing dataset use the following instructions:
Instructions for Editing an Existing Dataset
Open the Data toolbox located on the left-hand side of the Rguroo application window to see the names of the existing datasets.
Use one of the following three options to edit a selected dataset:
- Double-click on the dataset name
- Right-click on the name and select the option Edit from the context menu
- Select the name and press the Enter key.
Use the dataset editor features to modify your dataset. See Notes in the Section Creating a new dataset on how to enter data and navigate between cells.
Click the
 button to save your changes.
2.3 Variable and Row Management Dialog
The Variable and Row Management dialog can be accessed by clicking on the its icon ![]() . This dialog is used for changing variable names, changing variable types, reordering and relabeling levels of factors (categorical variables), and adding rows and columns (variables) to your dataset.
. This dialog is used for changing variable names, changing variable types, reordering and relabeling levels of factors (categorical variables), and adding rows and columns (variables) to your dataset.
Note (categorical = Factor Variables): Categorical variables, and specifically Nominal and Ordinal variables, are referred to as Factors in Rguroo.
In the dataset editor, the name of each variable is displayed on the column header. Default variable names are Var1, Var2, etc. You have two options, shown below, for changing variable names. The first option is useful when you need to change the names of multiple variables at the same time, while the second option is useful when you want to change the name of a single variable quickly.
Changing Variable Names: Option 1
Click on the Variable and Row Management icon
 . This will open the Variable and Row Management dialog.
From the list of variables displayed, select the variable that you want to rename.
Locate the Name textbox within the dialog, and type your desired new variable name in the textbox.
Press the Enter key on your keyboard. The new variable name will now appear in the header, replacing the old name.
Note: Variable names cannot contain spaces. Make sure to avoid using spaces when entering the new variable name.
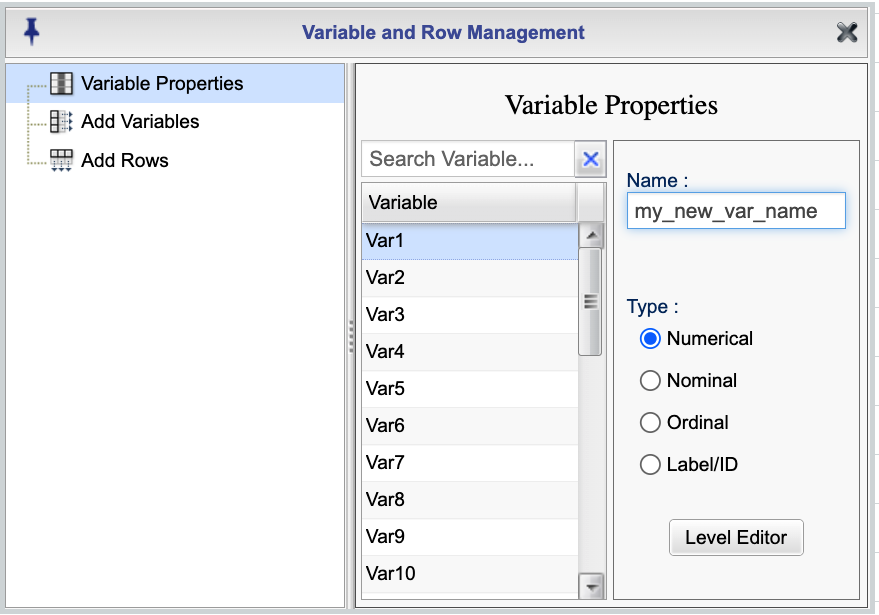
Figure 2.2: Variable and Row Management Dialog
Changing Variable Names: Option 2
Move your cursor over the variable name on the header. You will see the Variable Context Menu icon
 .
.Click on the icon to open the variable context menu (shown on the left panel in the figure below).
From the menu select the option Rename. This will bring up the Rename Variable dialog box (shown on the right panel in the figure below).
In the dialog box, type in the new name for your variable, and press enter. The new name will now appear on the header. Note that variable names cannot have spaces.

Figure 2.3: Variable Context Menu and Rename Variable Dialog
Use the following instructions to add new variables to your dataset:
Adding Variables to an Existing Dataset
Click on the Variable and Row management icon
 to open its dialog.
Select the Add Variables option. The dialog shown in the figure below shows.
Type in the number of variables that you want to add in the No. of Variables textbox.
Select one of the Beginning or End options to place the variables.
Type a prefix for the name of the variables in the Name textbox. If you are adding a single variable, simply type in the name of the variable. (See notes below regarding variable names when adding multiple variables).
Click on the
 button.
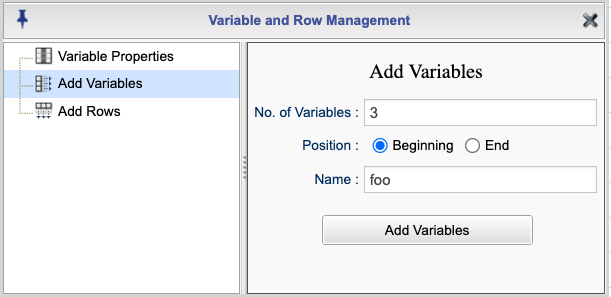
Figure 2.4: Dialog for Adding Variables to a Dataset
Notes about Adding Variables and Moving Variables
When adding variables to your dataset, there are two possible scenarios to consider for naming the variables:
Adding a Single Variable:
If you are adding only one variable, simply type its name directly.
For example, if you want to add a variable named “age”, just type “age” as the name.
Adding Multiple Variables:
If you are adding multiple variables simultaneously, you need to specify a prefix that will be used for all the variable names.
For instance, if you type in “foo” as the prefix, the first variable will be named “foo”, the second variable will be named “foo1”, the third variable will be named “foo2”, and so on.
To change variable names to your desired values, refer to the Section 2.3.1 for instructions on modifying the names according to your specific needs.
To change the location of variables in your dataset, you have two options:
Click and hold:
On the header, locate the variable name you want to move.
Click and hold the variable name.
Drag the variable name to your desired location in the header.
Release the mouse button to place the variable in the new location.
Columns Side Bar:
Open the Columns Side Bar.
Click and hold the column handle the column handle
 associated with the variable you want to move.
Drag the variable to your desired location within the side bar.
Release the mouse button to position the variable in the new location.
There are two options for adding rows to a dataset. The first option, described below, is useful for adding multiple rows simultaneously, while the second option is useful when you want to add one row at a time.
Adding Rows: Option 1
Click on the
 icon to open the Variable and Row Management dialog.
Select the Add Rows option. The dialog box shown in the figure below will appear.
Type in the number of rows that you want to add in the # of Rows textbox.
Select from one of the options Beginning, End, or Below Selected Row to indicate where you want the rows to be added.
Click on the
 button.
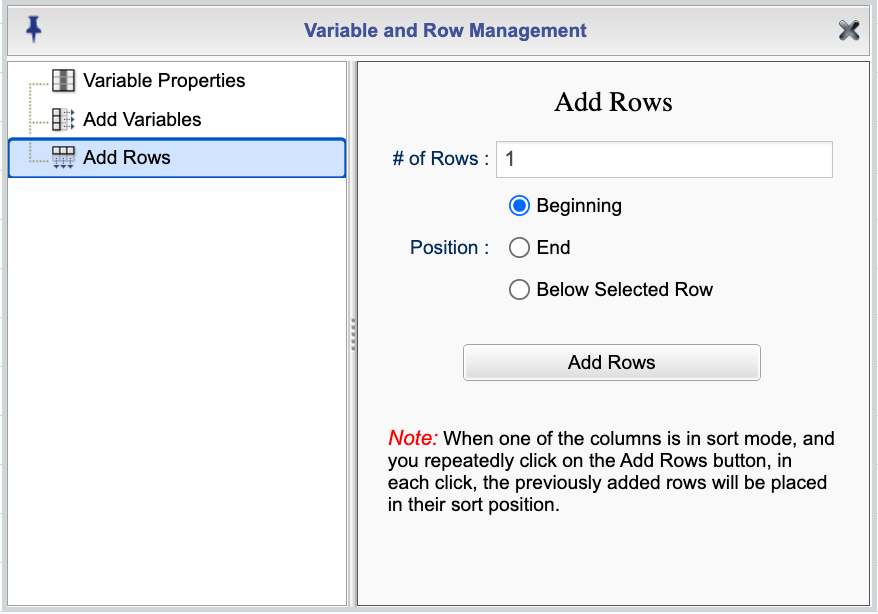
Figure 2.5: Dialog for adding rows to a dataset
Notes about adding rows:
To move the added rows, you can use the cut and paste option within the editor.
If a column is in sort mode and you click on the
 button repeatedly, each time you click the newly added rows will be placed in their appropriate sort position.
Adding a Single Row: Option 2
To add a new row above or below a selected row, follow these steps:
Select the row you want to add a new row above or below.
Right-click on the selected row to open the context menu.
Click on the Add Row option in the context menu.
Select either Below or Above to indicate where you want the new row to be added. The new row will be added either below or above the selected row, depending on your selection.
The transpose function in Rguroo flips the rows and columns of a dataset, converting rows into columns and columns into rows. To open the Transpose Data function, click on the Transpose Data icon ![]() . This opens the Transpose Data dialog shown in Figure 2.6 below.
. This opens the Transpose Data dialog shown in Figure 2.6 below.
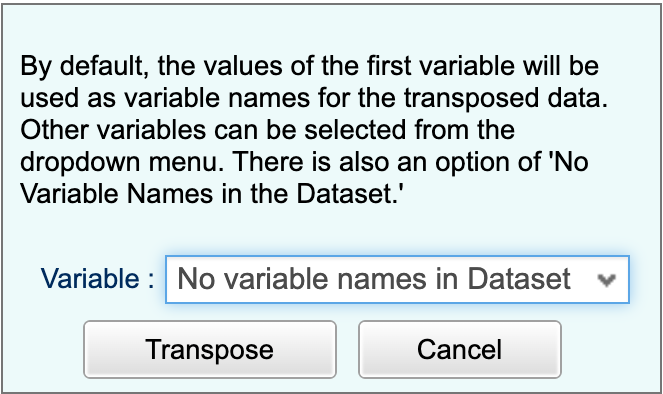
Figure 2.6: Transpose Data Dialog
Default Setting: By default, the transpose function uses the values of the first variable in the dataset as the variable names for the newly transposed columns.
For example, if the first variable in your dataset is “Month” and contains values like “January,” “February,” and “March,” these values will become the column names in the transposed dataset.
Selecting an existing Variable for Variable Names: If you prefer to use the values of an existing variable for the new column names, you can select it from a dropdown menu. The dropdown lists all available variables in the dataset.
For instance, if the dataset has variables like “Month,” “Category,” and “Region,” and you want “Region” to be used as the new column headers, you can choose “Region” from the dropdown menu.
Option for “No Variable Names in the Dataset” If your dataset does not have meaningful variable names, or if you do not wish to use any of the existing variables as column names, you can choose the option “No Variable Names in the Dataset.”
In this case, the transposed data will have automatically generated default column names, such as Var1, Var2, etc.
Each variable in Rguroo is classified into one of the following types: Numerical, Nominal, Ordinal, or Label/ID. In Rguroo’s application dialog boxes, Nominal and Ordinal variables are identified as Factors. For detailed information on how Rguroo determines default variable types and how to convert one variable type to another using the Variable and Row Management dialog, refer to the section Variable Types in Rguroo. This section also provides instructions for relabeling factor levels and reordering them.
2.4 Additional Dataset Editor Utilities
To remove rows from your dataset, you can use the following methods:
Removing a Single Row
- Select the row you want to remove by clicking on it.
- Right-click your mouse to open a dialog menu.
- In the dialog menu, locate and select the option Delete Row.
- The selected row will be deleted from the dataset.
Removing Multiple Row Simultaneously
- Select the rows that you want to delete.
- Right-click your mouse to open the dialog menu.
- In the dialog menu, find and select the option Delete Selected Rows.
- The selected rows will be deleted from the dataset.
Restoring Rows: When you delete rows, they are retained in the editor’s recycle bin. You can restore these rows by clicking on the trash (recycle bin) icon ![]() . You can use the Restore option in the row recycle bin or copy and paste items from there to restore the deleted rows.
. You can use the Restore option in the row recycle bin or copy and paste items from there to restore the deleted rows.
When your mouse hovers over a variable name, a three-horizontal-bar icon ![]() will appear. Click on the three-horizontal-bar icon to opne the Variable Context Menu, shown below.
will appear. Click on the three-horizontal-bar icon to opne the Variable Context Menu, shown below.
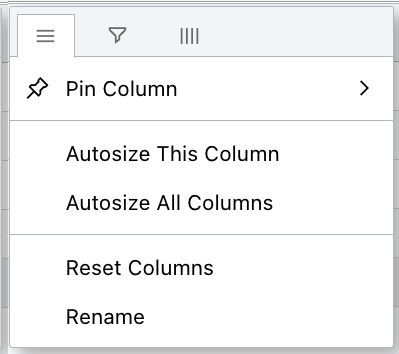
Figure 2.7: Variable Context Menu
You can perform the following tasks in the Variable Context Menu:
Pin the selected column to the left or right, and if the column is pinned you can unpin it.
Autosize the selected column to fit contents of the cells in that column or autosize all columns in the dataset.
Reset the column order to their original order, in case you have moved columns around.
Rename the variable shown in the selected column.
There is a filter icon ![]() and a four-vertical-bar icon
and a four-vertical-bar icon ![]() also on the Variable Context menu. Click on the filter icon to filter values for the selected variable. Click on the four-vertical-bar icon to filter variables in the dataset. This option is also available in the Column Sidebar menu.
also on the Variable Context menu. Click on the filter icon to filter values for the selected variable. Click on the four-vertical-bar icon to filter variables in the dataset. This option is also available in the Column Sidebar menu.
When you click on a variable name (column label) for the first time, the values in that column get sorted in ascending order, and an up-arrow appears next to the variable name. If you click on the variable name for a second time, the values in the column will be sorted in descending order, and a down-arrow appears next to the variable name. Clicking on the variable name for a third time will return the values of the variable to their original order.
You can repeat this process by clicking on the variable name again to toggle the sorting between original, ascending, and descending orders. Each click on the variable name will cycle through these three orders.
To perform a multicolumn sort, start by sorting the first column. Then, to sort based on additional variables, hold down the shift key and click on the new column. As long as you hold the shift key, the previously sorted columns will maintain their sort status.
Be Cautious When Sorting: When you apply sort to a column, you will lose your previous actions in the grid. This means that you cannot use the Ctrl-Z command to undo previous actions. However, you can undo the sort by repeatedly clicking on the sorted column yo get to the initial state.
To open and close the Columns Sidebar menu, click on the ![]() tab. Within the sidebar, you can select or deselect variables that you want to include or exclude from the dataset, respectively. You can also use the search textbox to search for specific variables.
tab. Within the sidebar, you can select or deselect variables that you want to include or exclude from the dataset, respectively. You can also use the search textbox to search for specific variables.
To open and close the Filters Sidebar menu, click on the ![]() tab. Variable names are listed in this tab. Within this tab, variable names are listed. When you click on a variable name, you will see all of its unique values. You can filter the values of a selected variable by deselecting them. Note that when you filter a value from a variable, all rows containing that value will be removed from the dataset. To restore a filtered value, simply select the value again.
tab. Variable names are listed in this tab. Within this tab, variable names are listed. When you click on a variable name, you will see all of its unique values. You can filter the values of a selected variable by deselecting them. Note that when you filter a value from a variable, all rows containing that value will be removed from the dataset. To restore a filtered value, simply select the value again.
You can open the row context menu by right-clicking anywhere in the dataset editor. The context menu allows you to Cut, Copy, and Copy with Header your selected items. However, note that to paste copied contents, you must use Ctrl+V. Alternatively, you can cut and copy selected items using the keyboard shortcuts Ctrl+X and Ctrl+C, respectively.
To add a new row, use the Add Row option, which allows you to add a single row either above or below the currently selected row. To delete a row, use the Delete Row option, which deletes a single selected row, or use Delete Selected Rows, to remove multiple selected rows.
Use the Export option on the row context menu to export your data as a CSV or Excel file.
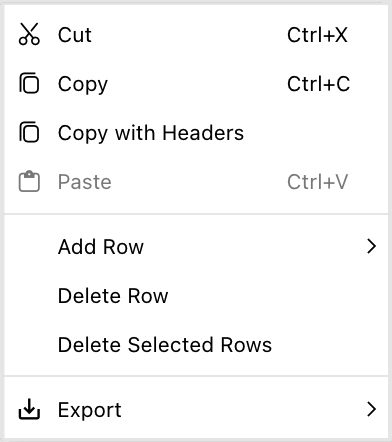
Figure 2.8: Row Context Menu Dialog
A Note about Undo and Sort: When you edit cells within the editor, you can use the Ctrl+Z shortcut to undo changes. However, if you sort a column or apply a function in the Variable and Row Management dialog, the Ctrl+Z undo option will no longer be available.
2.5 Search and Replace text
To quickly search for specific text in your dataset, type the text into the Quick Search textbox ![]() , and click on the down-arrow to search forward or the up-arrow to search backward from the current cursor. location. The first instance of the searched text will be highlighted in green, and the cursor moves to that cell. All other instances will be highlighted in yellow. You can navigate to each instance using the forward and backward arrows within the Quick Search textbox. To cancel the search, click the “X” in the Quick Search textbox.
, and click on the down-arrow to search forward or the up-arrow to search backward from the current cursor. location. The first instance of the searched text will be highlighted in green, and the cursor moves to that cell. All other instances will be highlighted in yellow. You can navigate to each instance using the forward and backward arrows within the Quick Search textbox. To cancel the search, click the “X” in the Quick Search textbox.
To perform a refined search in your dataset, click on the Search and Replace icon ![]() . This will open the Search and Replace dialog box, shown in the figure below.
. This will open the Search and Replace dialog box, shown in the figure below.
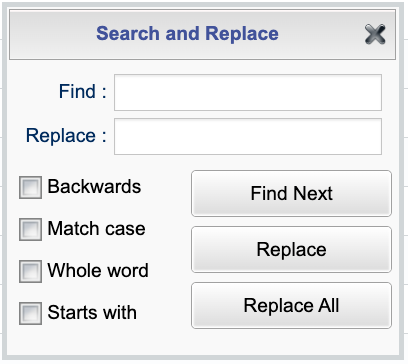
Figure 2.9: Search and Replace Dialog
In the Find textbox type the search text that you like to search. Optionally, refine your search by selecting one of the following: Match case, Whole word, or Starts with. Then click the ![]() button. The first instance of the searched text from the current cursor position will be highlighted in green and the cursor will move to that cell. All other instances of the searched text will be highlighted in yellow. To move to the next instance of the searched text (if exists), click on the
button. The first instance of the searched text from the current cursor position will be highlighted in green and the cursor will move to that cell. All other instances of the searched text will be highlighted in yellow. To move to the next instance of the searched text (if exists), click on the ![]() button repeatedly. To search backwards select the backwards checkbox. If you want to search backward, select the “backwards” checkbox. You can also use the down-arrow and up-arrow buttons within the Quick Search textbox to move forward and backward. To cancel the search, close the Search and Replace dialog box, and click the “X” within the Quick Search textbox.
button repeatedly. To search backwards select the backwards checkbox. If you want to search backward, select the “backwards” checkbox. You can also use the down-arrow and up-arrow buttons within the Quick Search textbox to move forward and backward. To cancel the search, close the Search and Replace dialog box, and click the “X” within the Quick Search textbox.
Once you find the text that you are looking for, you can replace it by typing the replacement text in the Replace textbox. Clicking the ![]() button will replace the first instance of the searched text from the current cursor position and move the cursor to the next instance of the searched text. If you need to replace text backward, check the Backwards checkbox. If you want to replace all instances of the searched text, click the
button will replace the first instance of the searched text from the current cursor position and move the cursor to the next instance of the searched text. If you need to replace text backward, check the Backwards checkbox. If you want to replace all instances of the searched text, click the ![]() button.
button.
Caution: You cannot undo cells that you replace using the Search and Replace dialog.